Photoshop-Photograph Manipulating
These are photographs that I took and then creatively used Photoshop to manipulate the photographs.

The first one is originally a print photograph that I scanned with my photo scanner. The second photo I wanted to show how to layer two photographs together. I used a close up picture of a flower and select and copied only the flower not the rest of the picture. I pasted the photograph on another layer and positioned it on the top of the sunrise picture. I changed the opacity and the fill opacity and also changed the blend mode to lighten only on the flower layer. I positioned the flower over the sun to present flower power. The natural sunrise I had to select the photograph in 4 different sections and changed the filter color temperature and tint. I wanted to show how a sunrise would look if it did not have a yellow tint to everything. The last photograph. I took the original photograph and then layered the natural photograph on top. I then changed the blend mode to color dodge and changed the opacity to the natural photograph layer only. I also had to merge the 2 layers together to make the sun look like an explosion.
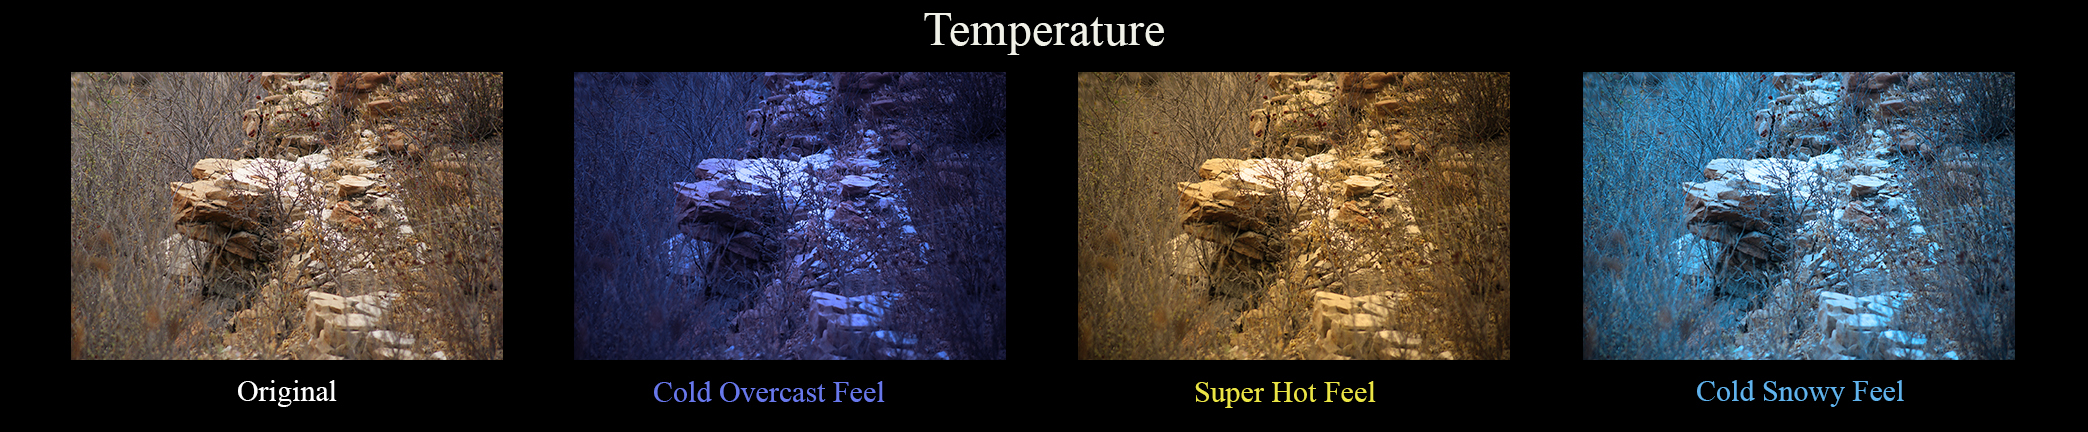
With the temperature photographs I wanted to show how using filters can effect a picture and make it look like it was taken at a different time of the year. The first one on the left (after the original one), cold overcast feel, I wanted to make it look dark and cold, like it was taken on a very cold day that was very cloudy with no sun able to peak out. To do that I had to change the temperature/tint color mostly blue. The, super hot feel, I wanted it to look like it was taken on the hottest day in the summer, which meant I had to use a filter that turn it yellow. I wanted it to feel like the sun is beating down on the rocks and make it feel like a very hot desert look. The 'cold snowy feel' I had to use a light blue filter tint to make it seem like I took the picture during a day that was covered with clouds and about to start snowing.

With these images I wanted to show my creativity and experience on being able to use a filter on just one object in an image, instead of using a filter for the whole image. The original photograph is the picture on the right, the end of fall. I wanted to make the leaf look as real as possible. The first image on the left I wanted it to look green but not pure green because it is the start of fall when the leaf is slowly losing color and starting to lose the moisture out of the leaf. I was tempted to use red and yellow in the leaf but I wanted to just use three images and the main stages of a leaf, when the leaf is green, when the leaf is losing moisture and color, and the end of the life of a leaf on the tree. Also, I wanted to show the original image so you can see exactly what I did. The image in the middle I wanted to make the leaf look pale and a lack of moisture. I also wanted to show that I can use a filter and not make the full object one color but make it a variety of colors that integrated as one, the brown taking over the leaf.

I wanted to show you my original photograph that I took and compared it to the filtered one. What inspired me for the filtered photograph was a blanket that I was cuddled up with. I remember shopping at the mall and seeing a kiosk that would take any photograph that you had and they could put it on a mug, mouse pad, pillow, a throw blanket, and much, much more. I wanted the photograph to look like one of the throw blankets.

I wanted to show how I can manipulate a photograph. This time I wanted to give the sun a different shape, to give it another meaning. I used the Liquify filter to accomplish that task.